When it comes to comparing Flutter with React Native, the most popular argument has been a more native user experience with buttery smooth animations and graphics drawing support. Flutter uses Skia, a very popular, open-source 2D graphics engine made by Google and used in Chrome and Android to draw everything natively with great performance.
On the other hand, React Native uses the platform specific rendering engines which is great but much slower. All this slowness is there because of a bridge which sends all information to Java/Objective-C in batches from the Javascript side. Since everything is single threaded, under heavy load the FPS drops; you see blank spaces in FlatLists, lag during scroll, and a lot of hang ups.
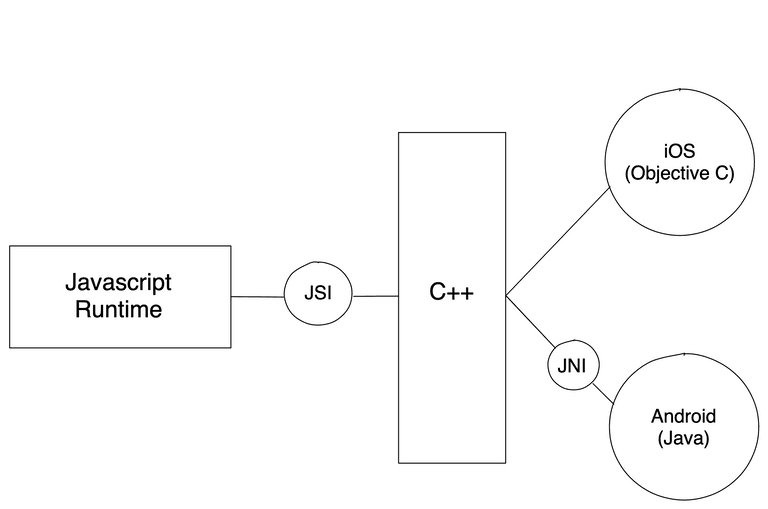
React Native had a good increase in performance when Hermes came out but soon the React Native team realized that the only factor holding back performance was the JS-Native bridge. React Native needed a better and faster way of communication with native side. So the React Native team started to work on the new architecture (JSI + Fabric + Turbo Modules).
Today the new architecture is in it's final stages and about to be released to the public in the next React Native release changing many things for React Native. However, it's still very uncertain (due to lack of proper documentation) how the new architecture actually works.
Currently only a handful of libraries have used this new architecture. The most prominent ones have been react-native-reanimated and @shopify/react-native-skia. Today we will be using @shopify/react-native-skia to build a fully native, 60 FPS, free-hand drawing app to explore the possibilities.
We will be building a very simple free-hand drawing app in React Native with the following features:
- Free hand drawing
- Color selection
- Variable stroke
- Undo/redo
- Export the drawing to standard SVG format
Getting started
Create a new react native project
We are starting from a fresh react native project.
npx react-native init skia-drawing-appInstalling dependencies
react-native-skia is not yet released on npm hence we will add it directly from GitHub releases
npm install https://github.com/Shopify/react-native-skia/releases/download/v0.1.103-alpha/shopify-react-native-skia-0.1.103.tgzAnd zustand for React state management.
npm install zustandProject structure
.
┃  📦src
┃  ┣ 📂components
┃  ┃ ┣ 📜color.tsx
┃  ┃ ┣ 📜header.tsx
┃  ┃ ┣ 📜stroke.tsx
┃  ┃ ┗ 📜toolbar.tsx
┃  ┣ 📂drawing
┃  ┃ ┣ 📜constants.tsx
┃  ┃ ┣ 📜history.tsx
┃  ┃ ┣ 📜index.tsx
┃  ┃ ┗ 📜utils.tsx
┃  ┗ 📂store
┃  ┃ ┗ 📜index.ts
┣ 📜App.tsx- The
componentsfolder has the toolbar & all the basic components. - The
drawingfolder has all the logic + the drawing board. - We are using
zustandfor global state management. The store folder has our global state where we keep drawing paths and paint information.
Building the drawing board
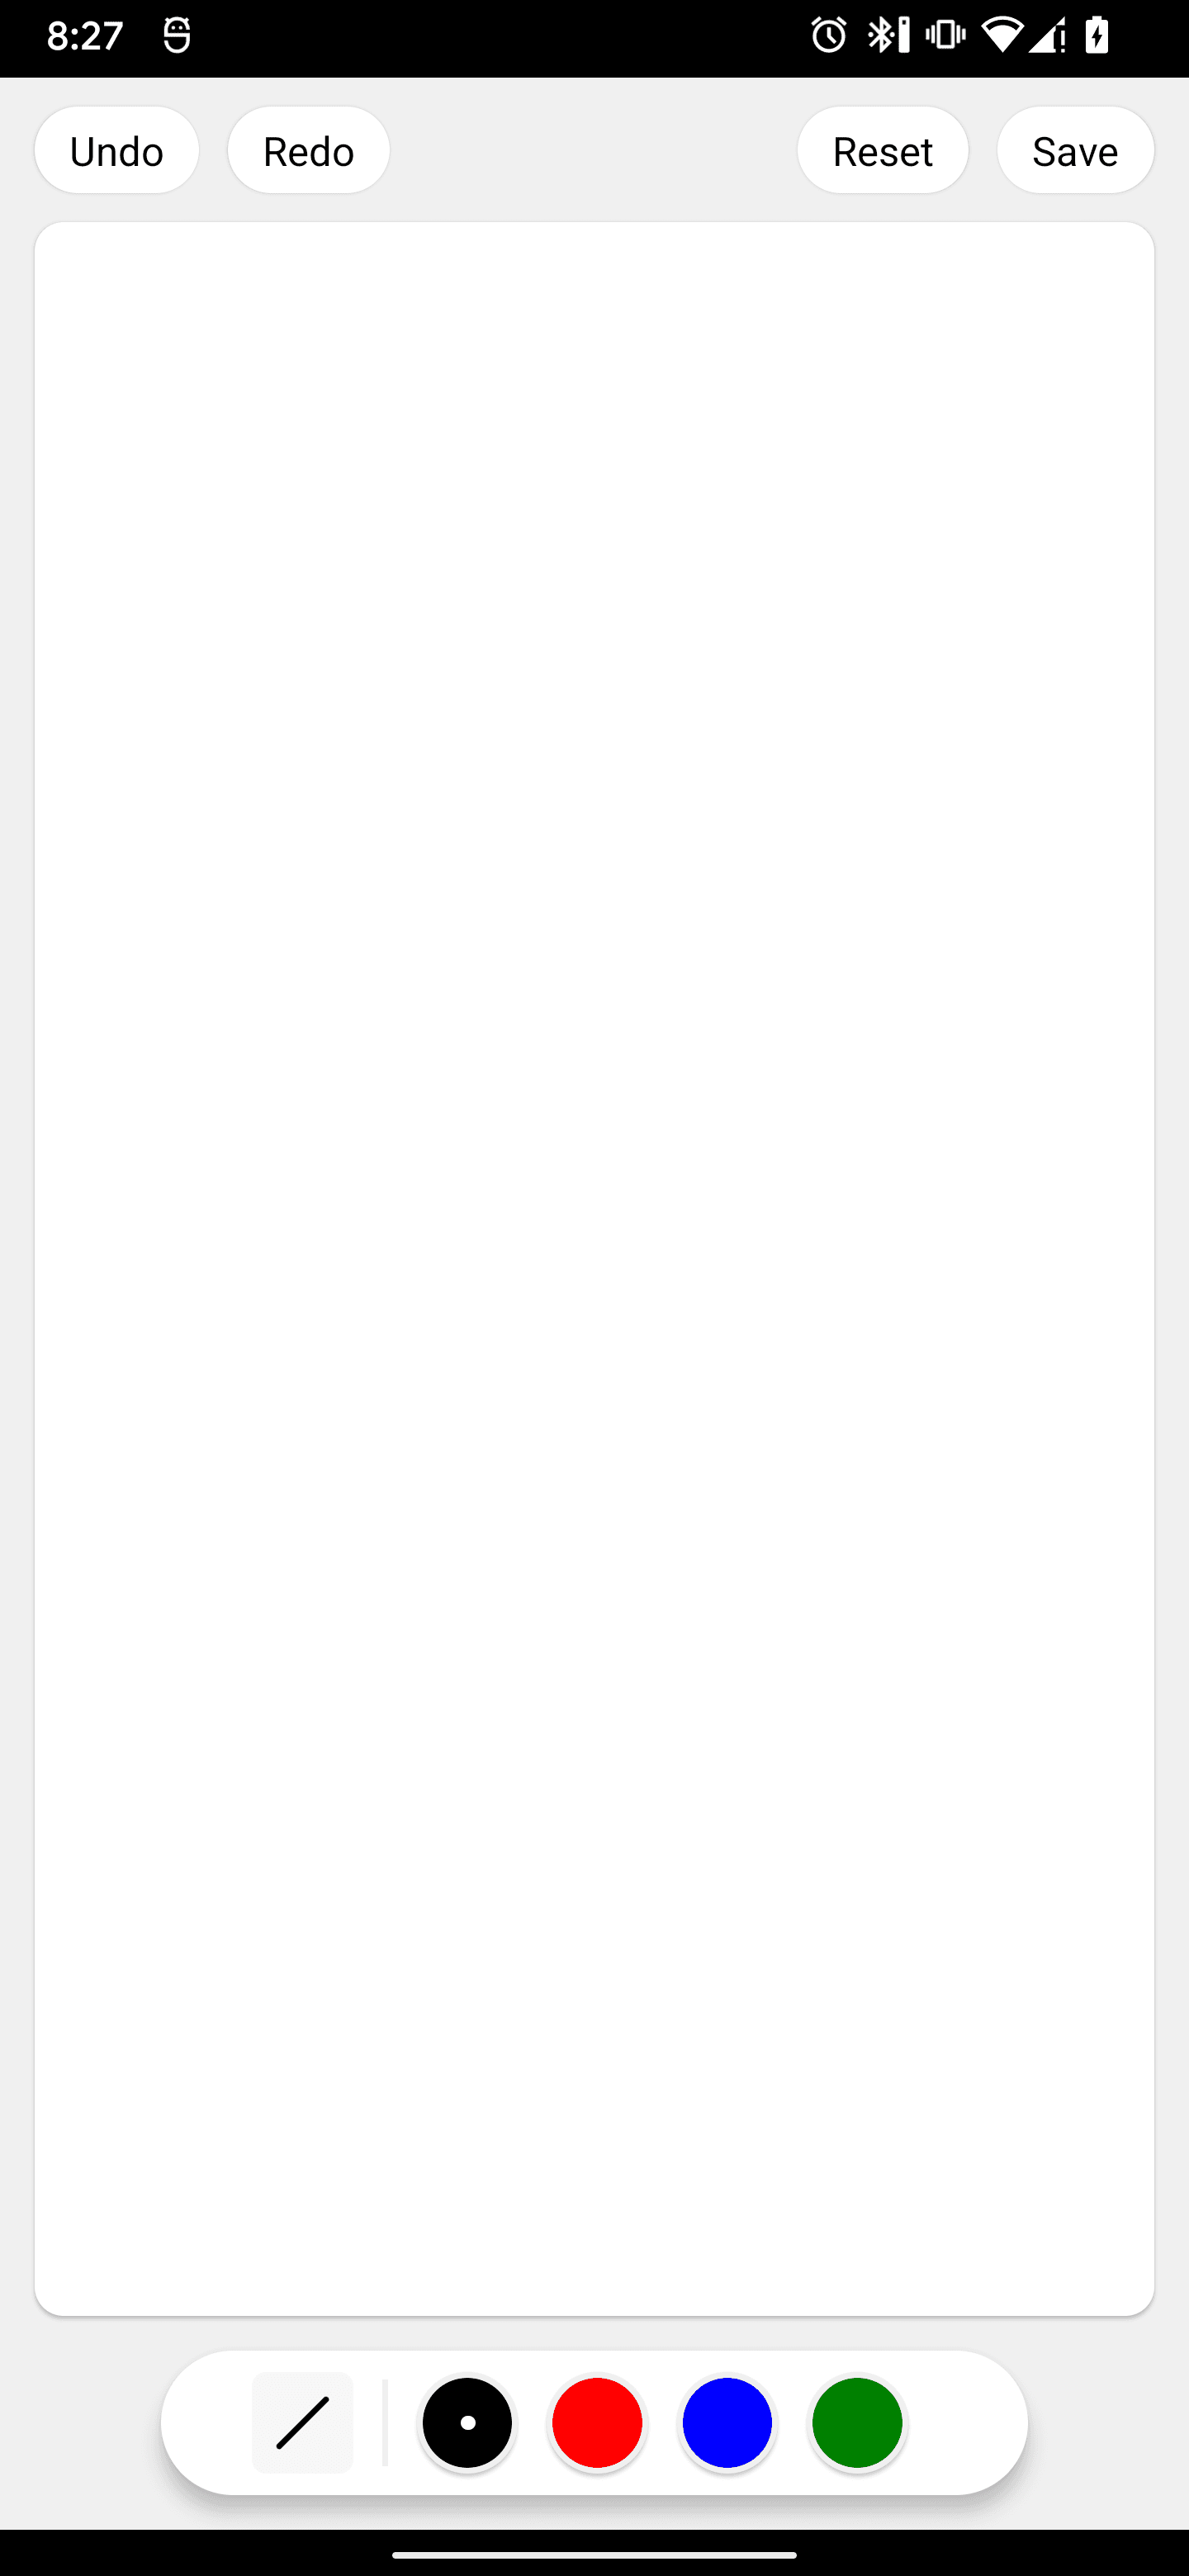
The drawing board consists of 3 components: Header, Canvas and Toolbar interconnected by the global state as shown below.
1. The global state
We are using zustand for global state. The following interface will help you understand the purpose of each property in the state:
import { DrawingInfo, IPaint, IPath } from '@shopify/react-native-skia';

interface DrawingStore extends State {
  /**
   * Array of completed paths for redrawing on the `Canvas`
   */
  completedPaths: CurrentPath[];
  /**
   * A function to update completed paths
   */
  setCompletedPaths: (completedPaths: CurrentPath[]) => void;
  /**
   * Current stroke. Basically a paint object from Skia
   */
  stroke: IPaint;
  /**
   * Width of the stroke, used when creating stroke.
   */
  strokeWidth: number;
  /**
   * Color of the stroke
   */
  color: string;
  setStrokeWidth: (strokeWidth: number) => void;
  setColor: (color: string) => void;
  setStroke: (stroke: IPaint) => void;

  /**
  Width & height information of the canvas used for svg export
  */
  canvasInfo: Partial<DrawingInfo> | null;
  setCanvasInfo: (canvasInfo: Partial<DrawingInfo>) => void;
}
The state stores and coordinates everything between all the different components.
2. Canvas
Canvas is where all the drawing takes place (obviously).
Objective: Draw a path when the user touches the screen & moves their finger, and save it.
import {
  Canvas,
  ExtendedTouchInfo,
  ICanvas,
  Path,
  Skia,
  SkiaView,
  TouchInfo,
  useDrawCallback,
  useTouchHandler
} from '@shopify/react-native-skia';
import React, { useCallback, useRef, useState } from 'react';
import {
  LayoutChangeEvent,
  SafeAreaView,
  useWindowDimensions,
  View
} from 'react-native';
import useDrawingStore, { CurrentPath } from '../store';
import Header from '../components/header';
import history from './history';
import Toolbar from '../components/toolbar';

const Drawing = () => {
  // Is user touching the screen
  const touchState = useRef(false);
  // Instance of canvas for imperative access
  const canvas = useRef<ICanvas>();
  // The current path which the user is drawing. The value is reset when finger is raised from screen
  const currentPath = useRef<CurrentPath | null>();
  const { width } = useWindowDimensions();
  // Array of completed paths from global state
  const completedPaths = useDrawingStore((state) => state.completedPaths);
  // A function in global state to add/remove paths
  const setCompletedPaths = useDrawingStore((state) => state.setCompletedPaths);
  // Stroke value from global state
  const stroke = useDrawingStore((state) => state.stroke);
  // Height of canvas, set on layout of View wrapping Canvas
  const [canvasHeight, setCanvasHeight] = useState(400);

  const onDraw = useDrawCallback((_canvas, info) => {
    if (!canvas.current) {
      useDrawingStore.getState().setCanvasInfo({
        width: info.width,
        height: info.height
      });

      canvas.current = _canvas;
    }
  }, []);

  // We need to provide absolute height to the canvas as percentages/flex won't work.
  // Therefore when the `View` renders, we get the height and keep it in state. This
  // height will be the height of Canvas & SkiaView components.
  const onLayout = (event: LayoutChangeEvent) => {
    setCanvasHeight(event.nativeEvent.layout.height);
  };

  return (
    <SafeAreaView
      style={{
        flex: 1
      }}
    >
      <View
        style={{
          backgroundColor: '#f0f0f0',
          flex: 1,
          alignItems: 'center'
        }}
      >
        <Header />

        <View
          onLayout={onLayout}
          style={{
            width: width - 24,
            flexGrow: 1,
            backgroundColor: '#ffffff',
            borderRadius: 10,
            overflow: 'hidden',
            elevation: 1
          }}
        >
          <SkiaView
            onDraw={onDraw}
            style={{ height: canvasHeight, width: width - 24, zIndex: 10 }}
          />

          <Canvas
            style={{
              height: canvasHeight,
              width: width - 24,
              position: 'absolute'
            }}
          >
            {completedPaths?.map((path) => (
              <Path
                key={path.path.toSVGString()}
                path={path.path}
                //@ts-ignore
                paint={{ current: path.paint }}
              />
            ))}
          </Canvas>
        </View>

        <Toolbar />
      </View>
    </SafeAreaView>
  );
};

export default Drawing;
The Drawing component is responsible for drawing paths on touch input. It consists of three Skia components.
SkiaView: Draws the current when user touches the screen and moves their finger.Canvas: When the user raises their finger from theSkiaViewthat path is rendered on the underlyingCanvas. This is why theCanvascomponent is rendered absolutely below theSkiaView.Path: Once a path is drawn onSkiaView, it is added tocompletedPaths. Completed paths are rendered using thePathcomponent declaratively.
To draw on the SkiaView we need an instance of the internal canvas to access the methods imperatively. We do this by subscribing to the onDraw callback. In the onDraw function we store a reference to the Canvas. We are also storing width & height of the Canvas in the global state.
The Drawing component is rendered in App.tsx like so:
import React from 'react';
import Drawing from './src/drawing';

const App = () => {
  return <Drawing />;
};

export default App;
Subscribing to touch events with useTouchHandler hook
To be able to draw on the SkiaView we have to subscribe to the touch events on the SkiaView. Whenever the user touches on the canvas and moves their finger, the onDraw callback is called with the relevant touch-point data. We will pass this data to our touchHandler which is a hook provided by react-native-skia.
  const touchHandler = useTouchHandler({
    onActive: onDrawingActive,
    onStart: onDrawingStart,
    onEnd: onDrawingFinished,
  });

  const onDraw = useDrawCallback((_canvas, info) => {
    touchHandler(info.touches);
...
We call the touchHandler function every time onDraw callback is called with data about the current touch.
The onDrawingStart callback
As soon as the user touches the screen, onDrawingStart is called.
const onDrawingStart = useCallback(
  (touchInfo: TouchInfo) => {
    if (currentPath.current) return;
    const { x, y } = touchInfo;
    currentPath.current = {
      path: Skia.Path.Make(),
      paint: stroke.copy()
    };

    touchState.current = true;
    currentPath.current.path?.moveTo(x, y);

    if (currentPath.current) {
      canvas.current?.drawPath(
        currentPath.current.path,
        currentPath.current.paint
      );
    }
  },
  [stroke]
);- We get the current
x&yposition of touch on theSkiaView. - We update the
currentPathref with a new path. - We set the
touchStateref totrue. - We move the pen in
currentPathtox/yposition withmoveTofunction so that drawing starts from this point. - Finally we draw the path on canvas with
drawPathfunction.
The onDrawingActive callback
While the user moves finger on the screen, we update the path based on the movement.
const onDrawingActive = useCallback((touchInfo: ExtendedTouchInfo) => {
  const { x, y } = touchInfo;
  if (!currentPath.current?.path) return;
  if (touchState.current) {
    currentPath.current.path.lineTo(x, y);
    if (currentPath.current) {
      canvas.current?.drawPath(
        currentPath.current.path,
        currentPath.current.paint
      );
    }
  }
}, []);- We get the current
x&yposition of touch on theSkiaView. - We create the path using
lineTofunction to where the touch has moved. - Finally we draw the path on canvas with
drawPathfunction. It takes two values. the current path and stroke information. Thestrokecontains information about thecolor,width&sizeof the stroke.
The onDrawingFinished callback
When the user raises the finger from the screen, we store the current path in global state using the updatePaths function and reset touchState and currentPath.
const onDrawingFinished = useCallback(() => {
  updatePaths();
  // reset the path. prepare for the next draw
  currentPath.current = null;
  // set touchState to false
  touchState.current = false;
}, [completedPaths.length]);

const updatePaths = () => {
  if (!currentPath.current) return;
  // Copy paths in global state
  let updatedPaths = [...completedPaths];

  // Push the newly created path
  updatedPaths.push({
    path: currentPath.current?.path.copy(),
    paint: currentPath.current?.paint.copy(),
    // The current color of the stroke
    color: useDrawingStore.getState().color
  });

  // Update history (will get to this later in the blog)
  history.push(currentPath.current);

  // Update the state.
  setCompletedPaths(updatedPaths);
};
Once the paths update, They are rendered on the Canvas below SkiaView as I mentioned above. We can also draw all the paths on the same SkiaView but it will be too intensive because all paths need to be redrawn every time onDraw is called.
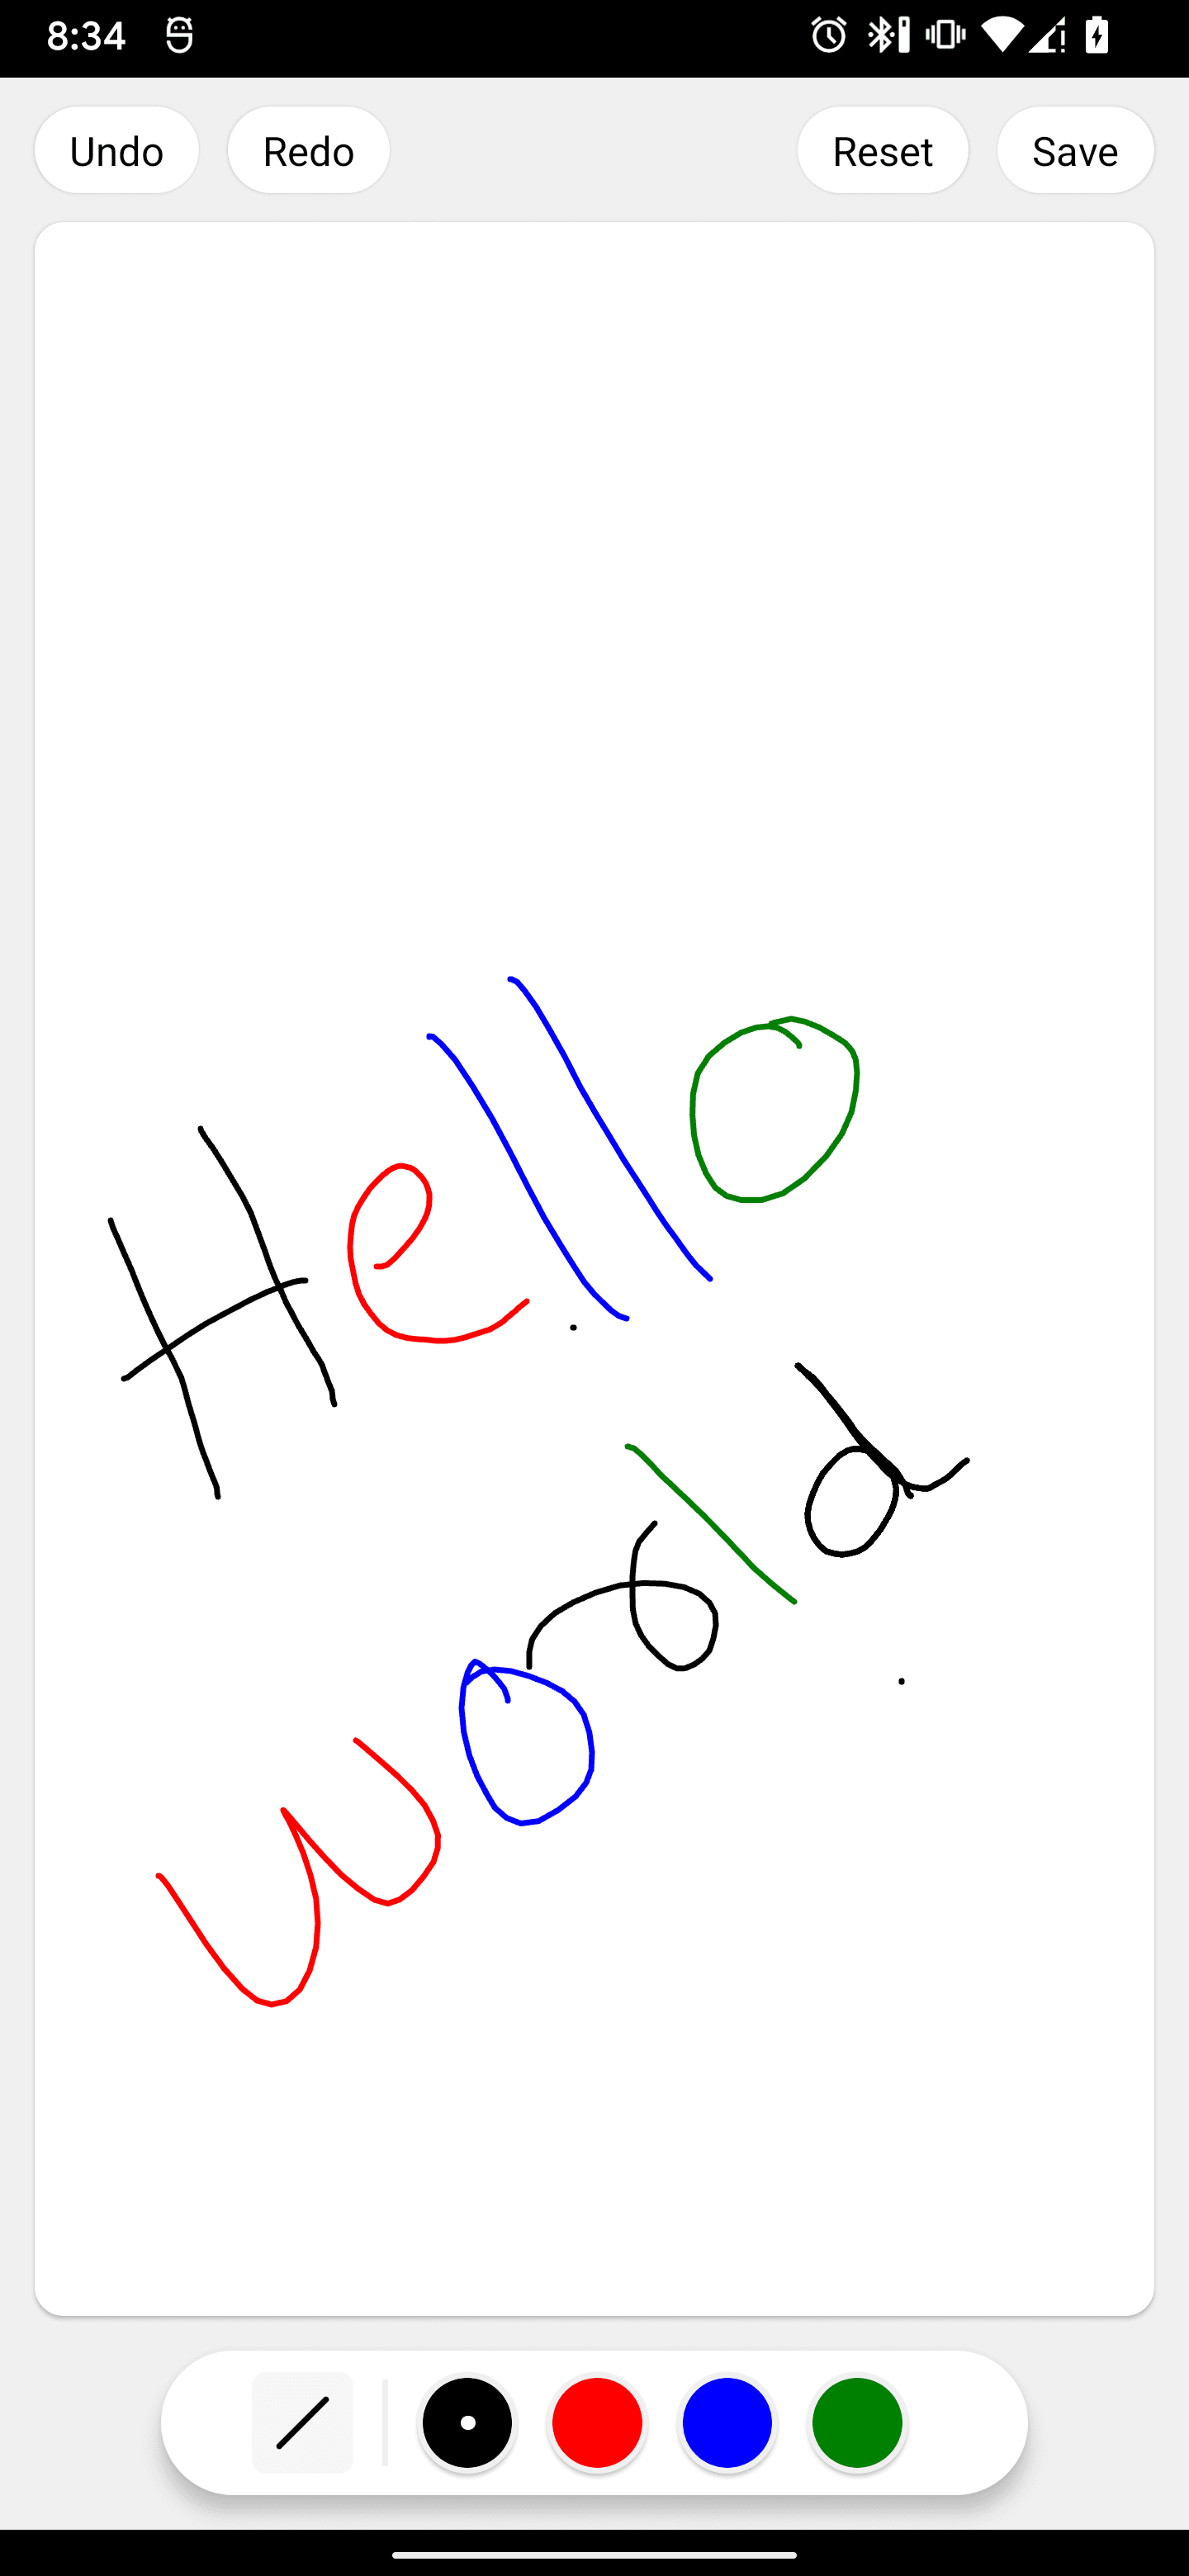
So far you'll be able to draw multiple paths freely:
3. Toolbar
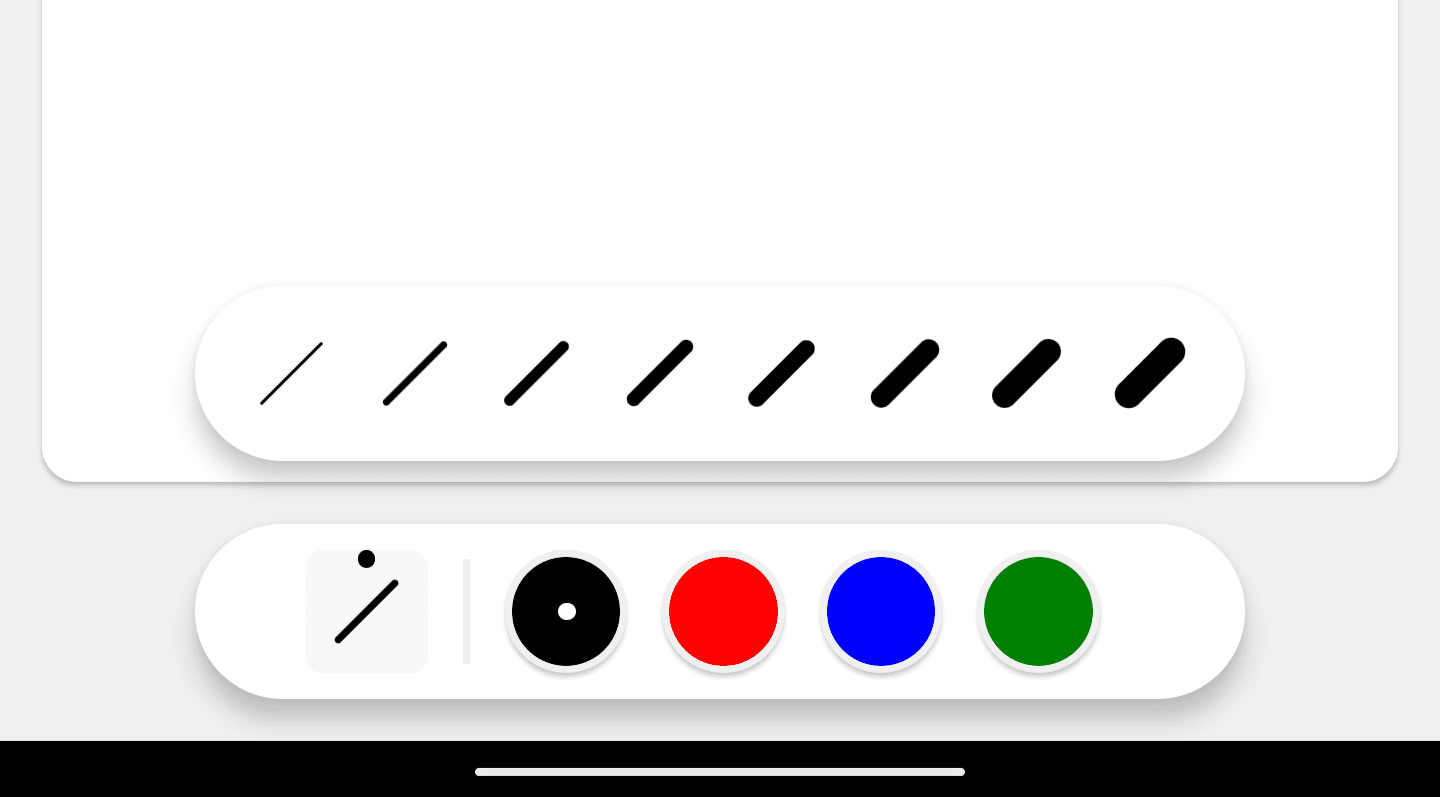
Our drawing app has a neat toolbar at the bottom having 3 main functions.
- Set the color.
- Set the stroke width.
- Generate a stroke based on current color & width.
import React, { useState } from 'react';
import { StyleSheet, View } from 'react-native';
import Color from '../components/color';
import Stroke from '../components/stroke';
import useDrawingStore from '../store';
import constants from '../drawing/constants';
import utils from '../drawing/utils';

const Toolbar = () => {
  const currentColor = useDrawingStore((state) => state.color);
  const currentStrokeWidth = useDrawingStore((state) => state.strokeWidth);
  const setStrokeWidth = useDrawingStore((state) => state.setStrokeWidth);
  const setColor = useDrawingStore((state) => state.setColor);
  const setStroke = useDrawingStore((state) => state.setStroke);
  const [showStrokes, setShowStrokes] = useState(false);

  const onStrokeChange = (stroke: number) => {
    setStrokeWidth(stroke);
    setShowStrokes(false);
    setStroke(utils.getPaint(stroke, currentColor));
  };

  const onChangeColor = (color: string) => {
    setColor(color);
    setStroke(utils.getPaint(currentStrokeWidth, color));
  };

  return (
    <>
      {showStrokes && (
        <View
          style={[
            styles.toolbar,
            {
              bottom: 80,
              position: 'absolute'
            }
          ]}
        >
          {constants.strokes.map((stroke) => (
            <Stroke
              key={stroke}
              stroke={stroke}
              onPress={() => onStrokeChange(stroke)}
            />
          ))}
        </View>
      )}

      <View
        style={[styles.toolbar, { position: 'relative', marginVertical: 12 }]}
      >
        <View
          style={{
            backgroundColor: '#f7f7f7',
            borderRadius: 5
          }}
        >
          {showStrokes && (
            <View
              style={{
                width: 5,
                height: 5,
                borderRadius: 100,
                backgroundColor: 'black',
                alignSelf: 'center',
                position: 'absolute'
              }}
            />
          )}

          <Stroke
            stroke={currentStrokeWidth}
            onPress={() => setShowStrokes(!showStrokes)}
          />
        </View>

        <View
          style={{
            height: 30,
            borderWidth: 1,
            borderColor: '#f0f0f0',
            marginHorizontal: 10
          }}
        />

        {constants.colors.map((item) => (
          <Color key={item} color={item} onPress={() => onChangeColor(item)} />
        ))}
      </View>
    </>
  );
};

export default Toolbar;
Generating a stroke
You must be wondering what utils.getPaint does. The getPaint function is responsible for generating different kind of strokes using Skia.Paint:
import {
  PaintStyle,
  Skia,
  StrokeCap,
  StrokeJoin
} from '@shopify/react-native-skia';

const getPaint = (strokeWidth: number, color: string) => {
  const paint = Skia.Paint();
  paint.setStrokeWidth(strokeWidth);
  paint.setStrokeMiter(5);
  paint.setStyle(PaintStyle.Stroke);
  paint.setStrokeCap(StrokeCap.Round);
  paint.setStrokeJoin(StrokeJoin.Round);
  paint.setAntiAlias(true);
  const _color = paint.copy();
  _color.setColor(Skia.Color(color));
  return _color;
};
Wherever needed, we can update the current stroke of the next path that is drawn on canvas:
setStroke(utils.getPaint(currentStrokeWidth, item));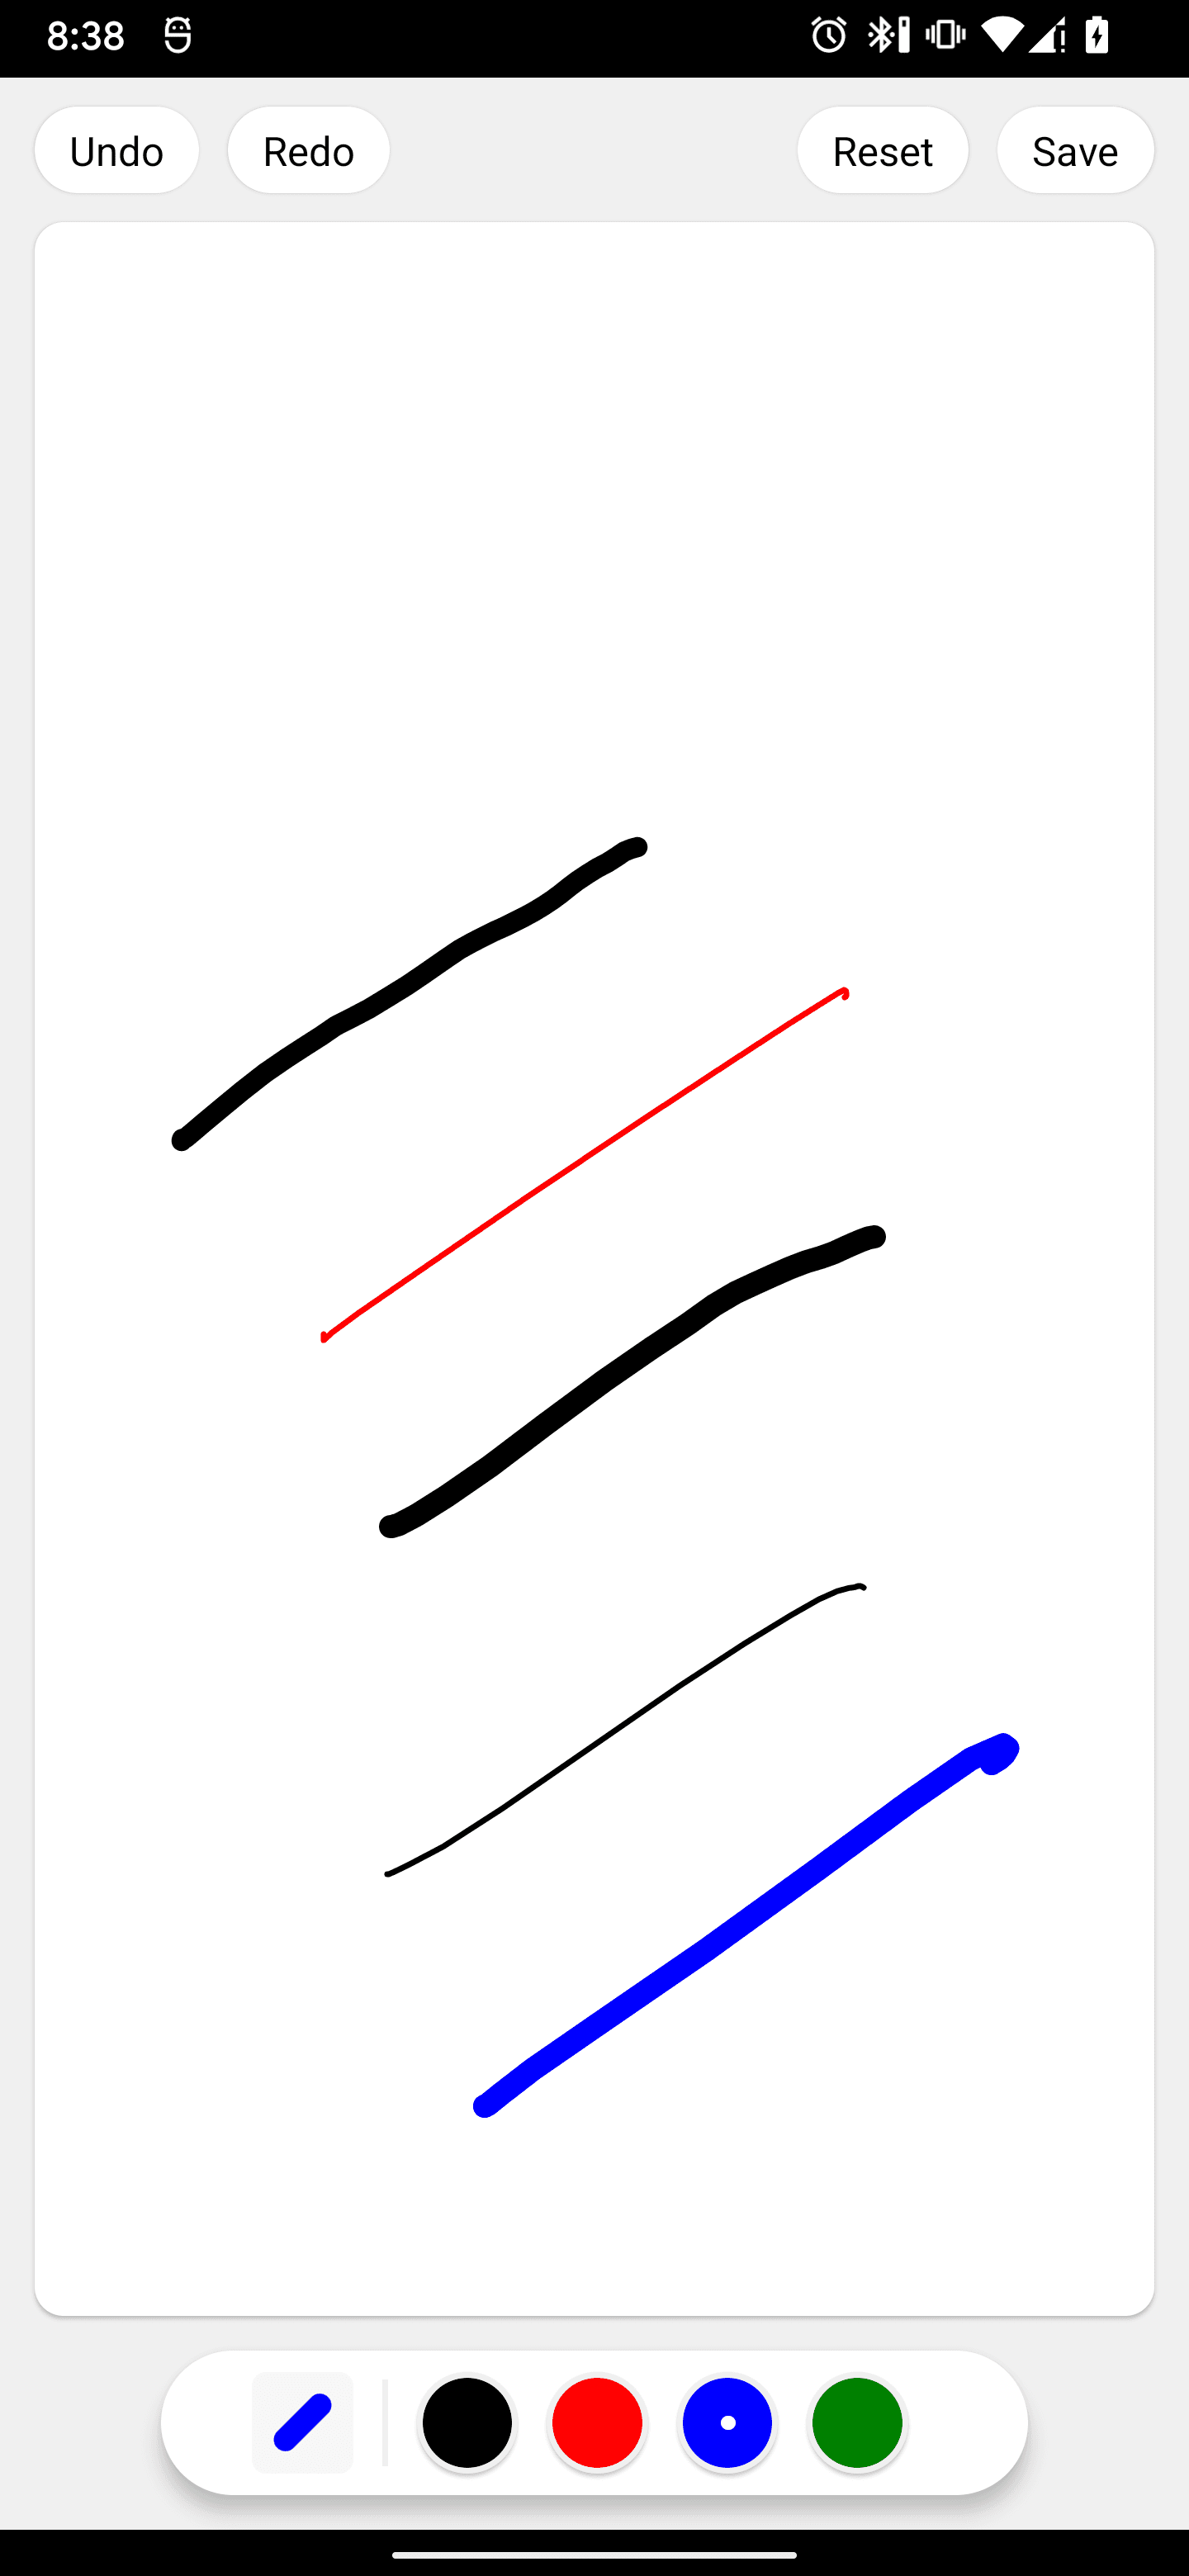
4. Header
The header component has buttons for undo, redo, reset and save.
import React from 'react';
import { Text, View, TouchableOpacity, StyleSheet } from 'react-native';
import useDrawingStore from '../store';
import history from '../drawing/history';
import utils from '../drawing/utils';

const Header = () => {
  /**
   * Reset the canvas & draw state
   */
  const reset = () => {
    useDrawingStore.getState().setCompletedPaths([]);
    useDrawingStore.getState().setStroke(utils.getPaint(2, 'black'));
    useDrawingStore.getState().setColor('black');
    useDrawingStore.getState().setStrokeWidth(2);
    history.clear();
  };

  const save = () => {
    let canvasInfo = useDrawingStore.getState().canvasInfo;
    let paths = useDrawingStore.getState().completedPaths;
    if (paths.length === 0) return;
    console.log('saving');
    if (canvasInfo?.width && canvasInfo?.height) {
      console.log(
        utils.makeSvgFromPaths(paths, {
          width: canvasInfo.width,
          height: canvasInfo.height
        })
      );
    }
  };

  const undo = () => {
    history.undo();
  };

  const redo = () => {
    history.redo();
  };
  return (
    <View
      style={{
        height: 50,
        width: '100%',
        paddingHorizontal: 12,
        flexDirection: 'row',
        justifyContent: 'space-between',
        alignItems: 'center'
      }}
    >
      <View
        style={{
          flexDirection: 'row'
        }}
      >
        <TouchableOpacity
          activeOpacity={0.6}
          onPress={undo}
          style={[styles.button, { marginRight: 10 }]}
        >
          <Text style={styles.buttonText}>Undo</Text>
        </TouchableOpacity>

        <TouchableOpacity
          onPress={redo}
          activeOpacity={0.6}
          style={styles.button}
        >
          <Text style={styles.buttonText}>Redo</Text>
        </TouchableOpacity>
      </View>

      <View
        style={{
          flexDirection: 'row'
        }}
      >
        <TouchableOpacity
          onPress={reset}
          activeOpacity={0.6}
          style={styles.button}
        >
          <Text style={styles.buttonText}>Reset</Text>
        </TouchableOpacity>

        <TouchableOpacity
          activeOpacity={0.6}
          onPress={save}
          style={[styles.button, { marginLeft: 10 }]}
        >
          <Text style={styles.buttonText}>Save</Text>
        </TouchableOpacity>
      </View>
    </View>
  );
};

export default Header;- Undo: Removes the last added path in
completedPathsarray. - Redo: Re-adds a path removed by
undo. - Reset: Resets the drawing board to default state.
- Save: Generate an SVG from all the paths in
completedPaths.

History
History keeps track of all the changes on the drawing board.
import useDrawingStore, { CurrentPath } from '../store';

const history: {
  undo: CurrentPath[];
  redo: CurrentPath[];
} = {
  undo: [],
  redo: []
};

// Clear undo/redo stacks
function clear() {
  history.undo = [];
  history.redo = [];
}

// Push a new path to undo stack
function push(path: CurrentPath) {
  history.undo.push(path);
}
When users stops drawing. The newly created path is added to history with history.push function.
1. Undo
function undo() {
  if (history.undo.length === 0) return;
  // Get the last path in history
  let lastPath = history.undo[history.undo.length - 1];
  // Add the path to redo history
  history.redo.push(lastPath);
  // Remove path from undo history
  history.undo.splice(history.undo.length - 1, 1);
  // Update global state so the drawing board redraws
  useDrawingStore.getState().setCompletedPaths([...history.undo]);
}
2. Redo
function redo() {
  if (history.redo.length === 0) return;
  // Get last path from redo history
  let lastPath = history.redo[history.redo.length - 1];
  // Remove the path from redo history
  history.redo.splice(history.redo.length - 1, 1);
  // Add the path to undo history
  history.undo.push(lastPath);
  // Update the state
  useDrawingStore.getState().setCompletedPaths([...history.undo]);
}
Exporting the drawing as an SVG file
Once drawing completes, it can be exported to svg format using makeSvgFromPaths function
const makeSvgFromPaths = (
  paths: CurrentPath[],
  options: {
    width: number;
    height: number;
    backgroundColor?: string;
  }
) => {
  return `<svg width="${options.width}" height="${
    options.height
  }" viewBox="0 0 ${options.width} ${
    options.height
  }" fill="none" xmlns="http://www.w3.org/2000/svg">
    <rect width="${options.width}" height="${options.height}" fill="${
    options.backgroundColor || 'white'
  }"/>
  <g>

    ${paths.map((path) =>
      path.paint && path.path
        ? `<path d="${path.path.toSVGString()}" stroke="${
            path.color
          }" stroke-width="${path.paint.getStrokeWidth()}" stroke-linecap="${path.paint.getStrokeCap()}" stroke-linejoin="${path.paint.getStrokeJoin()}"/>`
        : ''
    )}
    </g>
    </svg>`;
};
For each path in completedPaths array, we generate a <path/> svg component with stroke, color and width from the path so that it matches the exact drawing.
const save = () => {
  // Get canvas info, basically width and height. This will be the size of svg.
  let canvasInfo = useDrawingStore.getState().canvasInfo;
  // Get the paths from global state
  let paths = useDrawingStore.getState().completedPaths;
  if (paths.length === 0) return;
  if (canvasInfo?.width && canvasInfo?.height) {
    // Generate the svg. Saving the svg to a file can be done here
    console.log(
      utils.makeSvgFromPaths(paths, {
        width: canvasInfo.width,
        height: canvasInfo.height
      })
    );
  }
};
Conclusion
Imagine the possibilities, the sheer butter-smoothness that can be achieved with react-native-skia! This was a very basic drawing app — touching only the surface of what's possible with this amazing library. Features like path selection, movement & resizing or animations can be easily added.
The only issue currently is the lack of documentation. I was unable to find anything about the imperative API of react-native-skia which forced me to delve into the codebase and figure everything out myself. But once proper documentation is finished, the whole ecosystem of React Native will change.
You can find the complete code for the above tutorial on Github. Free free to check it out & play with it.
